How to Re-Grip a Slippery Pull-Up Bar With Sweat-Resistant Tape?
A slippery pull-up bar can ruin a great workout in seconds. Your palms start sweating, your hands slide off the bar, and suddenly your set ends three reps too early. The good news is that you don’t need to buy a new bar or expensive accessories.
A simple roll of sweat-resistant tape can transform any smooth metal bar into a high-traction training tool. This guide walks you through every step of the re-gripping process.
You will learn which tapes work best, how to wrap the bar correctly, and how to keep that grip lasting for months. Let’s fix that slippery bar problem once and for all.
In a Nutshell:
- Sweat-resistant tape adds friction and absorbs moisture, turning a slick chrome or steel bar into a surface your hands can actually hold during heavy sets.
- Athletic tape, hockey tape, and dedicated grip tape are the three main options, with each one offering different levels of comfort, durability, and stickiness for your training style.
- Clean the bar thoroughly with rubbing alcohol before wrapping. Any dust, oil, or old residue will cause the tape to peel within days instead of lasting weeks.
- Wrap the tape in a tight spiral with 50 percent overlap for the strongest hold. Loose wraps slip under load and create painful pinch points on your skin.
- Replace the tape every four to eight weeks depending on training frequency. Worn tape loses grip, traps bacteria, and can tear mid set.
- Combine tape with light chalk for the best results when you train in hot or humid conditions. The two work together to keep your hands dry and locked in.
Why Pull-Up Bars Get Slippery in the First Place
Most pull-up bars come with a chrome or powder coated finish. These surfaces look clean but offer almost zero friction when your hands sweat. Sweat creates a thin liquid layer between your skin and the metal. That layer acts like a lubricant.
Some bars have knurling, which is the rough crosshatch pattern you see on barbells. Knurling helps a lot, but it wears down over time and can still get slippery in humid garages or basements. Cheaper home bars often skip knurling entirely.
Hand oils, lotion residue, and dust also build up on the bar surface. Each layer makes the bar slicker than the last. This is why even a brand new bar can feel slippery after a few weeks of use. Re-gripping with tape solves both problems at once by adding texture and absorbing moisture.
Choosing the Right Sweat-Resistant Tape for the Job
Not all tapes work the same way on a pull-up bar. The three most popular options each have strengths and weaknesses that affect your training experience.
Athletic tape is white, cloth based, and used by gymnasts and CrossFit athletes. It absorbs sweat very well and feels soft on the palms. The downside is that it wears out faster than other options.
Hockey tape is thicker and stickier. It holds up to heavy use and feels grippy even when wet. However, the adhesive can leave residue when removed.
Dedicated grip tape made for calisthenics offers the best balance. It uses a textured surface and strong adhesive backing. The cost is higher, but the lifespan is longer.
Pros of athletic tape include low cost and skin comfort. Cons include short lifespan and peeling at the edges. Pros of hockey tape include durability and strong grip. Cons include sticky residue and a harder feel under the fingers.
Tools and Materials You Need Before You Start
Gathering everything before you begin saves time and frustration. You don’t need much, but each item plays a role in getting a clean, lasting wrap.
You will need a roll of sweat-resistant tape, sharp scissors, rubbing alcohol or isopropyl wipes, a clean cloth, and optionally a pair of nitrile gloves to keep your hands clean. A measuring tape helps you cut tape strips to size if you prefer the strip method over continuous wrapping.
Choose a tape width between three quarters of an inch and one and a half inches for the easiest wrapping experience. Wider tape covers faster but bunches on tight bends. Narrower tape gives more control but takes longer.
If your bar is wall mounted, place a small step stool nearby. You want both hands free and the bar at chest height for the cleanest wrap. Working overhead causes uneven tension and lumpy results.
Step One: Clean the Pull-Up Bar Thoroughly
Skipping this step is the number one reason tape jobs fail within a week. Tape needs a clean surface to bond properly with the metal underneath.
Soak a clean cloth with rubbing alcohol. Wipe the entire bar surface, paying extra attention to the spots where your hands usually grip. Sweat, body oil, and dust create an invisible barrier that prevents the tape adhesive from sticking.
Let the bar dry completely for at least five minutes. Any moisture trapped under the tape will weaken the bond and cause peeling. If you live in a humid area, give it ten minutes to be safe.
Inspect the bar for rust spots or flaking paint. Sand these areas lightly with fine grit sandpaper if you find any. A smooth, clean, dry bar is the foundation of a grip that lasts for months instead of days.
Step Two: Mark Your Hand Placement Zones
Before unrolling any tape, figure out where your hands actually go. Most lifters use two or three different grip widths during their training sessions.
Stand under the bar and place your hands in your normal pull-up position. Mark each hand spot with a small piece of painter’s tape as a reference point. Then try a wide grip and a close grip and mark those too.
You only need to wrap the zones where your hands make contact. This saves tape and keeps the rest of the bar clean for hygiene reasons. A typical wrap zone is about ten to twelve inches wide on each side.
If you train chin-ups, neutral grip, or mixed grip, add those positions to your marks. Better to wrap a little extra than to find a slick spot in the middle of a heavy set. Take your time with this measurement.
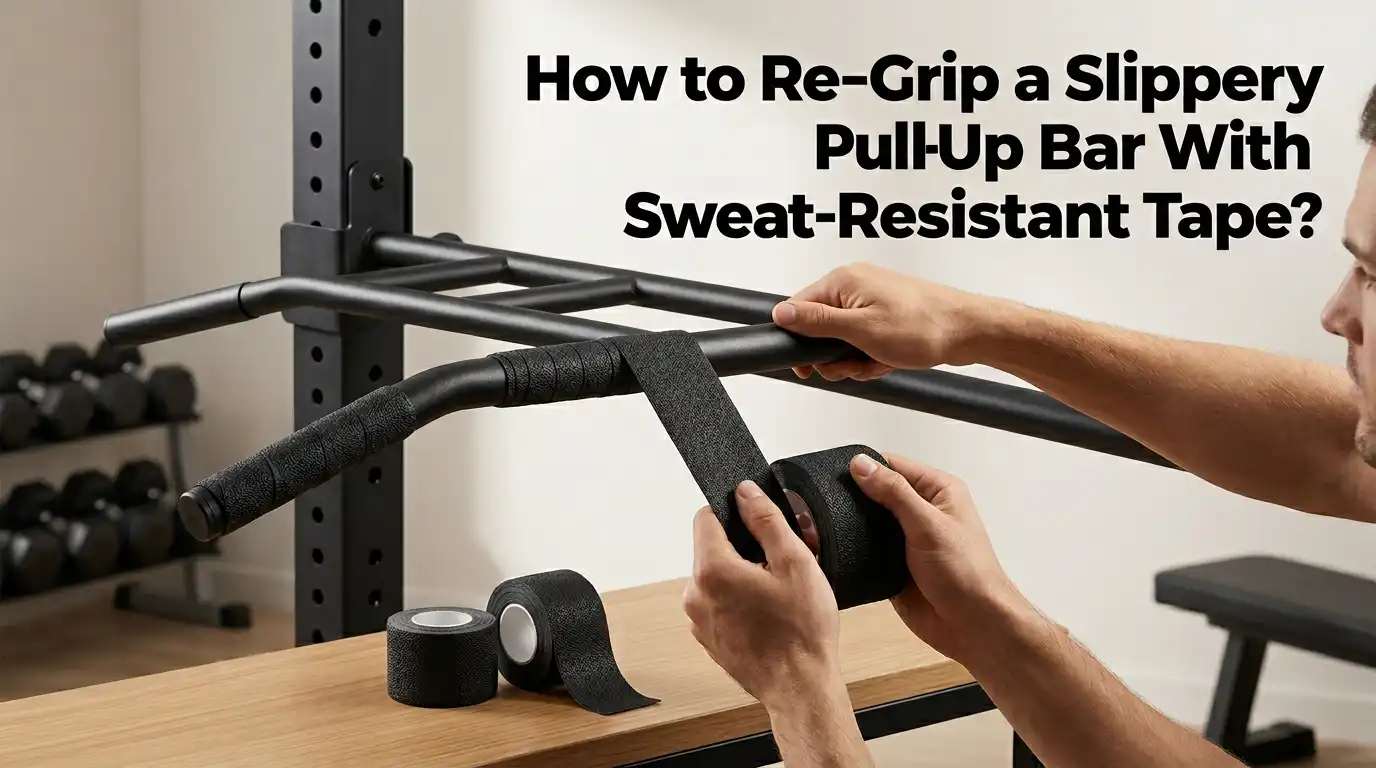
Step Three: Anchor the Tape With a Starter Wrap
The first wrap of tape sets the tone for the entire job. A loose start means everything that follows will shift and bunch under load.
Peel back about two inches of tape from the roll. Press the sticky side firmly against the bar at the outer edge of your grip zone. Hold it down with your thumb for a few seconds to let the adhesive bond before adding tension.
Wrap the tape around the bar twice in the same spot. This creates an anchor point that prevents the entire wrap from unraveling later. Pull each pass tight, but not so tight that the tape stretches and tears.
The starter wrap should feel like a solid ring around the bar. Run your finger over it to check for gaps or bubbles. Smooth any imperfections now, because they will only get worse as you continue down the bar.
Step Four: Spiral Wrap the Bar With Even Overlap
This is the main wrapping technique and the part that determines how good your grip will feel. Consistency matters more than speed.
Angle the tape roll about thirty degrees off the bar axis. Begin wrapping in a tight spiral, with each new pass overlapping the previous one by half. A fifty percent overlap doubles the thickness and eliminates any exposed bar between passes.
Keep steady tension as you wrap. The tape should stretch slightly but never to its breaking point. If you see the tape turn lighter in color, you are pulling too hard.
Rotate the bar in your hands rather than walking around it. This gives you better control and a cleaner spiral. Continue until you reach the inner edge of your grip zone, then add two more wraps in place to finish the section securely.
Step Five: Seal the Edges and Trim Excess
A clean finish prevents the tape from catching on your skin or peeling up during use. The last few inches deserve as much attention as the first.
Cut the tape with sharp scissors at the end of your final wrap. Press the cut edge down firmly with your thumb for at least ten seconds. This activates the adhesive and locks the seam in place.
Run your fingernail along every edge of the wrapped section. You are looking for any spot where the tape lifts away from the bar. Press these flat as you find them.
Repeat the entire process on the other grip zone. Take a quick break between sides to check your work and adjust your technique if needed. The second side usually comes out cleaner than the first because your hands have learned the rhythm.
Comparing Tape Methods: Continuous Spiral vs Strip Wrapping
Two main techniques exist for applying grip tape to a pull-up bar. Each one suits different training styles and skill levels.
The continuous spiral method uses one long piece of tape wrapped around the bar at an angle. It covers fast and creates a uniform texture across the entire grip zone. This is the method most lifters prefer for daily training.
The strip method uses short pieces of tape applied straight across the bar one at a time. This gives you more control over thickness and placement but takes much longer to complete.
Pros of the spiral method include speed, even coverage, and a smoother feel. Cons include less control over thickness and harder repairs when one section wears out. Pros of the strip method include precise customization and easy spot replacement. Cons include slower application, visible seams, and more tape waste. Most home gym users get the best results with the spiral method on their first try.
Adding Chalk and Other Boosters for Extreme Sweat
Tape alone handles most situations, but heavy training in hot conditions calls for backup. A combination approach keeps your grip locked in for the longest sets.
Apply a light layer of gym chalk to your hands before you grip the bar. Chalk absorbs the sweat that tape can’t catch and adds extra friction at the contact points. Liquid chalk works well too and creates less mess.
Avoid using chalk on a brand new tape job for the first few sessions. The chalk dust can mix with the adhesive and reduce stickiness around the edges. Let the tape settle for a day or two first.
Some lifters add a thin coat of clear grip enhancer spray over the tape. This boosts texture but can make the bar feel sticky in a uncomfortable way. Test a small section before committing to the full bar.
How to Maintain and Replace Your Grip Tape
A great wrap job still needs care to last. Treating your taped bar like part of your gear extends its life and protects your hands.
Wipe the tape down with a dry cloth after each session. Sweat left on the surface breeds bacteria and breaks down the cloth fibers from the inside out. A quick wipe takes ten seconds and adds weeks to the life of the wrap.
Inspect the tape weekly for fraying, peeling, or shiny smooth spots. Shiny patches mean the tape has lost its texture and will start slipping soon. Catch these early and patch them with a small piece of fresh tape.
Plan a full replacement every four to eight weeks for regular trainers. Heavy users who train daily may need monthly changes. When you remove old tape, use rubbing alcohol again to clean off any adhesive residue before applying the new wrap.
Common Mistakes That Ruin a Good Tape Job
Even with the right materials, a few small errors can sabotage your re-gripping project. Knowing these in advance helps you avoid them.
Wrapping over a dirty bar tops the list of mistakes. Dust and oil prevent the adhesive from bonding no matter how tight you pull the tape. The wrap looks great on day one and starts peeling by day three.
Pulling the tape too tight is another common error. Overstretched tape shrinks back over the next few hours and creates gaps along the spiral. It can also tear under load and unravel during a set.
Using the wrong tape type causes problems too. Painter’s tape, duct tape, and electrical tape all fail quickly on pull-up bars. They either lose stickiness from sweat or leave painful residue on your hands. Stick with athletic, hockey, or dedicated grip tape for best results.
Frequently Asked Questions
How long does sweat-resistant tape last on a pull-up bar?
A quality wrap job lasts between four and eight weeks for most home gym users. Heavy daily training shortens that to about three weeks, while light weekly use can stretch it to three months. Watch for fraying edges and shiny spots as signs that replacement time is near.
Can I reuse tape after removing it from the bar?
No, removed tape loses most of its adhesive strength and shape. The fibers stretch during use and the sticky backing collects dust and lint. Always start fresh with a new roll when you re-grip your bar for the best results.
Will grip tape damage my pull-up bar finish?
Most quality athletic and grip tapes leave little to no residue on chrome and powder coated bars. Hockey tape can leave a sticky film that wipes off with rubbing alcohol. Avoid duct tape and electrical tape, which can damage paint and leave hard residue behind.
Is tape better than wearing gym gloves?
Tape gives you direct contact with the bar, which most lifters prefer for feel and grip strength. Gloves add padding but reduce sensitivity and can actually slip more when wet. Tape also costs less per month than a quality pair of training gloves.
Can I wrap a textured or knurled bar with tape?
Yes, but you may not need to. Knurled bars already have built in grip from the crosshatch pattern. If your knurled bar still feels slippery during heavy sweat sessions, a single layer of thin athletic tape adds moisture absorption without covering the texture completely.
What if my hands still slip after taping the bar?
First check that your tape job has no shiny worn spots. If the tape looks fine, the issue is likely heavy sweating. Add a light coat of gym chalk or liquid chalk to your hands before each set. The combination of tape plus chalk handles even the most extreme sweat situations.

Hi, I’m Sarah Hill — the founder and voice behind Heavy Lift Vault. I’m passionate about fitness, strength training, and health technology. I spend my time researching, testing, and reviewing workout equipment and health devices so you don’t have to guess. My goal is to deliver honest, detailed, and trustworthy reviews that help you invest wisely in your fitness journey.