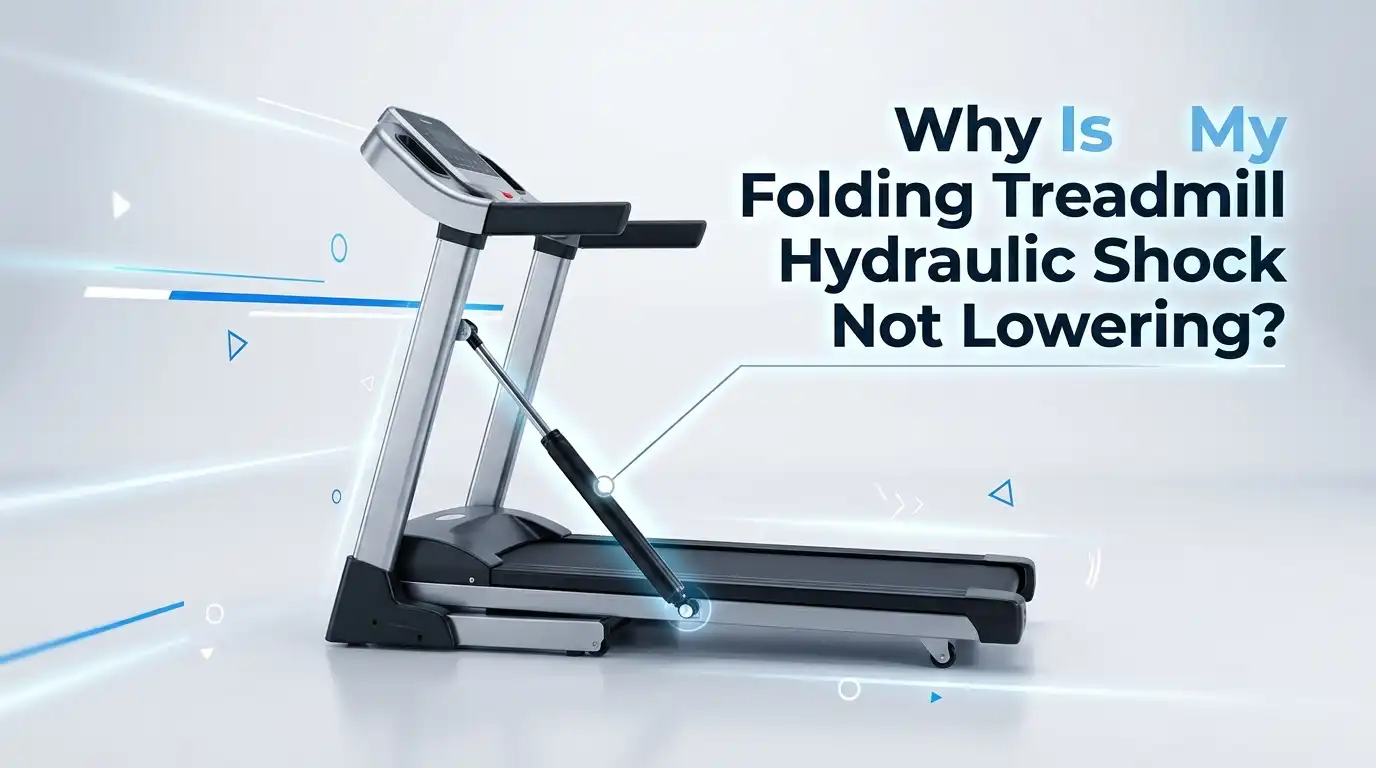
Why Is My Folding Treadmill Hydraulic Shock Not Lowering?
Your folding treadmill stays stuck in the upright position. You pull the release lever, and nothing happens. The deck refuses to drop down to the floor.
This problem frustrates many home gym owners, and it usually points to a tired or stuck hydraulic shock. The good news is that you can fix most cases yourself at home.
This guide walks you through every common cause and every practical solution. You will learn how the hydraulic shock works, how to test it, and how to replace it if needed.
Key Takeaways
- The hydraulic shock is the main culprit. A worn, leaking, or gas depleted shock loses its ability to control the deck. When the gas escapes, the deck either drops too fast or stays stuck up.
- The release latch matters just as much. A jammed or sticky latch blocks the deck from unlocking. Always check the latch before you blame the shock itself.
- Lubrication solves many stuck deck cases. Dry pivot points and dirty cylinder rods create friction that stops smooth movement. A little oil often brings the motion back to life.
- Most shocks are cheap and easy to swap. You can usually replace a treadmill gas shock with basic hand tools in under an hour. Match the length and stroke of your old part.
- Safety comes first every time. A folded deck holds stored energy, so you must support its weight with your hands or a helper. Never put your face or body under an unsecured deck.
- Regular care prevents future failures. Cleaning, lubricating, and inspecting the shock extends its life. Simple monthly checks save you money later.
How the Folding Treadmill Hydraulic Shock Works
Your folding treadmill uses a gas filled cylinder called a hydraulic shock or gas spring. This part connects the deck to the frame. When you fold the deck up, the shock compresses and holds the deck in place. When you release the latch, the shock controls how fast the deck lowers.
Inside the cylinder sits pressurized nitrogen gas and a small amount of oil. The gas pushes against a piston, which creates the soft, slow descent you expect. This design protects your floor and your feet from a heavy slam.
Over time, the gas leaks out and the oil breaks down. A healthy shock lowers the deck in a smooth, controlled way. A failing shock either drops the deck too fast or refuses to let it move at all. Knowing this helps you spot the exact problem.
Check the Release Latch First
Before you touch the shock, inspect the release latch. Many people assume the shock has failed when the real problem is a stuck lever. The latch holds the deck in the upright position until you unlock it. If the latch jams, the deck cannot move no matter how strong the shock is.
Look at the latch and try to push or pull it fully. Sometimes dirt, rust, or a bent pin keeps it from releasing completely. Press the lever firmly and watch whether the locking pin pulls free.
If the latch feels stiff, spray a little penetrating oil on the moving parts. Wait a few minutes and try again. A clean, well oiled latch should click and release with light pressure. This quick check can save you a full repair.
Pros and Cons of starting with the latch: The pro is that it is the fastest and cheapest check. The con is that it does not fix shock problems, so you may still need to dig deeper.
Inspect the Hydraulic Shock for Leaks
A leaking shock is one of the top reasons your deck will not lower correctly. Wipe the cylinder rod and body with a clean cloth, then look for oily streaks or wet residue. Fresh oil on the surface tells you the seal has failed.
Run your finger along the shiny metal rod. If you feel slick, greasy film, the internal seal is letting fluid escape. A small amount of light film can be normal, but heavy oil means trouble.
When the gas escapes through a leak, the shock loses its push and hold power. A shock with no gas pressure cannot guide the deck down in a slow, safe way. In many cases the deck then stays stuck or feels loose and wobbly.
Pros and Cons of inspecting for leaks: The pro is that it confirms the true failure point clearly. The con is that a leaking shock cannot be repaired and must be replaced.
Test the Shock Pressure and Resistance
You can test the shock without removing it. Support the deck with one hand and slowly push it down while watching the resistance. A healthy shock pushes back with firm, even force.
If the deck drops with almost no resistance, the gas has likely escaped. A dead shock feels loose, light, and offers little pushback. If the deck will not move at all even with the latch released, the rod may be seized or bent.
Try moving the deck a few times to feel for sticky spots. A good shock moves smoothly through its full stroke without grinding or sudden jolts. Rough or jerky motion points to internal wear or a dry rod.
Pros and Cons of this test: The pro is that you get instant feedback on shock health with no tools. The con is that you must hold the deck weight carefully, so it carries some risk if you work alone.
Lubricate the Pivot Points and Cylinder Rod
Dry and dirty parts cause friction that stops the deck from lowering. The pivot bolts, brackets, and the shiny cylinder rod all need to move freely. Old grease turns sticky and traps the deck in place.
Wipe the cylinder rod clean with a soft cloth first. Apply a thin layer of silicone spray or light machine oil to the rod and the pivot joints. Avoid heavy grease, since it attracts dust and dirt.
Work the deck up and down a few times to spread the lubricant. Fresh lubrication often restores smooth motion when the shock itself is still good. This step alone fixes many stuck deck complaints.
Pros and Cons of lubrication: The pro is that it is cheap, fast, and prevents future sticking. The con is that it only helps when friction is the issue, not when the shock has lost its gas.
Look for Bent or Damaged Frame Parts
Sometimes the shock works fine, but a bent frame stops the deck from moving. A dropped treadmill or a hard fold can twist the brackets that hold the shock. Even a small bend changes the angle and jams the motion.
Examine the metal arms and mounting points near the shock. Look for cracks, warps, or bolts that sit at odd angles. Compare both sides of the frame to spot any difference.
Tighten any loose bolts and straighten minor bends if you can. A misaligned frame puts extra stress on the shock and shortens its life. Fixing the frame restores the correct path for the deck.
Pros and Cons of this inspection: The pro is that it catches hidden damage that a shock swap would not solve. The con is that serious frame damage may need professional welding or a new frame.
Clean Dirt and Debris From the Mechanism
Dust, hair, and grime build up around the folding mechanism over time. These deposits clog the pivot points and stick to the cylinder rod. The buildup slows the deck and sometimes stops it completely.
Use a vacuum and a dry brush to clear loose debris first. Then wipe the metal surfaces with a damp cloth to remove sticky residue. Pay close attention to the area where the rod enters the cylinder.
A clean mechanism moves the way the maker intended. Regular cleaning keeps the shock and latch working smoothly for years. This simple habit prevents many lowering problems before they start.
Pros and Cons of cleaning: The pro is that it costs nothing and improves overall performance. The con is that deep grime sometimes hides a worn part that still needs replacing.
Reset the Deck Using the Correct Folding Steps
Many treadmills require a specific motion to unlock the deck. If you skip a step, the deck stays locked and feels stuck. People often miss the small release lever or the foot pedal.
Read your owner manual or look up the model online. Some decks need a gentle push up first to release the latch pressure before they will drop. Others use an orange release tab that you pull while guiding the deck down.
Follow the steps in the right order and apply steady, even force. Using the correct method removes guesswork and protects the shock from strain. A proper reset often solves what looks like a broken mechanism.
Pros and Cons of resetting: The pro is that it fixes user error fast with no parts or tools. The con is that it will not help if the shock or latch has truly failed.
How to Replace a Failed Hydraulic Shock
When the shock leaks or loses its gas, replacement is the real fix. First, fold the deck up and secure it with a strap or a helper so it cannot fall. Safety here is not optional.
Locate the bolts at each end of the shock. Use a wrench or socket set to remove the top bolt, then the bottom bolt. Hold the deck weight as you free the old shock.
Install the new shock by lining up the ends with the brackets. Bolt the bottom first, then the top, and tighten both ends firmly. Test the motion by lowering and raising the deck a few times.
Pros and Cons of replacement: The pro is that it fully restores smooth, safe lowering for years. The con is that you must match the exact length, stroke, and force rating of the old part.
How to Choose the Right Replacement Shock
Buying the wrong shock leads to a deck that slams or stays stuck. Measure the old shock from one mounting hole to the other while it is extended. This gives you the correct overall length.
Note the stroke, which is how far the rod travels in and out. Also check the force rating, often stamped in Newtons on the cylinder body. A higher rated shock holds heavier decks more firmly.
Match the mounting end style as well, since some use ball studs and others use eyelets. A close match in length, stroke, and force gives you safe, factory like motion. When in doubt, contact the treadmill maker with your model number.
Pros and Cons of choosing carefully: The pro is that the right part works perfectly the first time. The con is that exact specs take effort to find, especially for older or off brand machines.
Handle the Deck Safely During Any Repair
A folded treadmill deck stores real energy and weighs a lot. A sudden drop can crush your hand, break your foot, or damage your floor. Treat the deck as a loaded part at all times.
Always support the deck before you remove any bolt or part. Use a strong strap, a sturdy prop, or a second person to hold the weight. Keep your face and body out from under the raised deck.
Work on a flat, stable surface with good light. Slow, careful movements protect both you and the machine. Rushing this repair is the most common cause of injury.
Pros and Cons of safety steps: The pro is that you avoid injury and protect your equipment. The con is that careful work takes more time, which can feel slow when you want a quick fix.
When to Call a Professional Technician
Some problems go beyond a simple home repair. If the frame is cracked, the welds are broken, or the deck is badly warped, you need expert help. These issues affect your safety during workouts.
A trained technician has the right tools and replacement parts for your model. They can also spot wiring, motor, or incline faults that a quick look might miss. This matters most for high end or commercial machines.
Weigh the repair cost against the value of the treadmill. Sometimes a professional fix makes sense, and sometimes a new machine is the smarter choice. Get a quote before you decide.
Pros and Cons of hiring a pro: The pro is that you get a safe, guaranteed repair with no guesswork. The con is that service fees add up and may rival the cost of a new unit.
Prevent Future Hydraulic Shock Problems
A little care keeps your shock working for many years. Clean the folding mechanism and wipe the cylinder rod every month. Dust and grime are the silent killers of smooth motion.
Lubricate the pivot points and rod a few times a year. Avoid slamming the deck up or down, since hard impacts wear out the seals fast. Always fold and unfold the deck the way the manual shows.
Store the treadmill in a dry spot away from extreme cold or heat. Stable temperatures protect the gas and oil inside the shock. Small habits like these stretch the life of every part.
Pros and Cons of prevention: The pro is that you save money and avoid sudden failures. The con is that it takes a few minutes of routine effort that is easy to forget.
Frequently Asked Questions
Why does my treadmill deck drop too fast instead of staying stuck?
A deck that drops fast usually means the shock has lost its gas pressure. The nitrogen has leaked out, so the cylinder cannot slow the descent. Replace the shock to restore the safe, slow drop.
Can I fix a leaking hydraulic shock instead of replacing it?
No, a leaking gas shock cannot be repaired at home. The sealed cylinder loses its gas charge once the seal fails. Replacement is the only reliable fix for a leaking unit.
How long does a treadmill hydraulic shock last?
Most shocks last several years with normal use. Heavy folding, dirt, and hard slams shorten that life. Regular cleaning and gentle handling help the shock reach its full lifespan.
Is it safe to use my treadmill while the shock is broken?
You can usually run on the treadmill, since the shock only affects folding. However, a broken shock makes folding and storage unsafe. Fix the shock before you fold the deck again.
Do all folding treadmills use the same hydraulic shock?
No, shocks vary by length, stroke, and force rating. Each model needs a specific part that matches its weight and design. Always check your model number before you buy a replacement.
Why does the deck stay stuck even after I release the latch?
A stuck deck often points to a seized rod, dry pivots, or a bent frame. Clean and lubricate the parts first, then inspect for damage. If the motion stays jammed, the shock may need replacing.

Hi, I’m Sarah Hill — the founder and voice behind Heavy Lift Vault. I’m passionate about fitness, strength training, and health technology. I spend my time researching, testing, and reviewing workout equipment and health devices so you don’t have to guess. My goal is to deliver honest, detailed, and trustworthy reviews that help you invest wisely in your fitness journey.